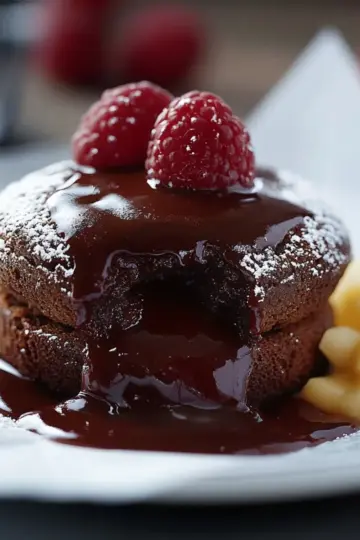
As I unwrapped the rich scent of dark chocolate from its foil, I felt a wave of comfort wash over me, much like a cozy hug on a chilly evening. Today, I'm thrilled to share my recipe for Dark Chocolate Mousse Brownies, a delightful fusion of fudgy goodness and silky mousse that’s bound to elevate any dessert lineup. What makes these brownies even better? They’re quick to whip up, making them the perfect treat when you’re short on time but long on cravings. Plus, they're an instant crowd-pleaser, sure to impress your guests while keeping your kitchen stress-free. So, are you ready to dive into a world of chocolatey indulgence that’s just a whisk away?
Why are these brownies a must-try?
Indulgent layers of dark chocolate mousse atop fudgy brownies create a dessert that's simply irresistible. Easy to make, you'll love how quick the preparation is, allowing you to satisfy your sweet tooth in no time! Versatile garnishing options like fresh berries and whipped cream elevate the presentation, ensuring these brownies impress at any gathering. Plus, their decadent flavor is a delightful escape from mundane fast food, making them the ultimate comfort treat. Treat yourself and your loved ones to this heavenly bite of chocolate bliss!
Dark Chocolate Mousse Brownie Ingredients
• You won't believe how simple these ingredients are!
For the Brownies
- 1 box brownie mix – use your favorite brand for a quick and easy base.
- ½ cup heavy cream – this will add richness to the chocolate mousse layer.
For the Mousse
- 2 teaspoons unflavored gelatin – helps the mousse set perfectly; don't skip it!
- 2 tablespoons cold water – used to bloom the gelatin for the best texture.
- 1 cup heavy cream – whip this up for an airy mousse that melts in your mouth.
- 8 ounces dark chocolate – choose good quality chocolate for deep, robust flavor.
For Garnishing
- Optional: white chocolate – a beautiful contrast when grated on top.
- Optional: fresh berries, mint leaves, powdered sugar – these add a pop of freshness and elegance!
These dark chocolate mousse brownies are more than just a dessert; they’re a celebration of flavors that everyone will love!
Step‑by‑Step Instructions for Dark Chocolate Mousse Brownies
Step 1: Prepare the Brownie Base
Preheat your oven according to the box brownie mix instructions. Prepare the mix by combining it with the specified ingredients, and then pour it into a greased baking pan. Bake for the designated time until a toothpick inserted in the center comes out clean. Once baked, remove from the oven and allow the brownies to cool completely in the pan on a wire rack.
Step 2: Melt the Dark Chocolate
In a heatproof bowl, add the chopped dark chocolate. Place this bowl over a pot of simmering water, creating a makeshift double boiler. Stir gently until the chocolate is fully melted and smooth, taking care not to let any water splash into the chocolate. Remove from heat and set aside to cool slightly while you prepare the gelatin.
Step 3: Bloom the Gelatin
Sprinkle the two teaspoons of unflavored gelatin over two tablespoons of cold water in a small dish. Allow it to sit for about 5 minutes undisturbed so the gelatin can bloom and absorb the water. This step is crucial for achieving a silky texture in your dark chocolate mousse brownies.
Step 4: Heat the Cream
In a saucepan, heat ½ cup of heavy cream over medium heat until it just begins to bubble. Stir occasionally to avoid scorching. Once it's boiling, promptly remove it from the heat and pour it over the melted chocolate. Mix well until the combination becomes a luscious, glossy chocolate mixture.
Step 5: Incorporate the Gelatin
Warm the bloomed gelatin in the microwave or over low heat until fully dissolved, about 10-15 seconds in the microwave should do the trick. Carefully add the dissolved gelatin to the chocolate mixture, stirring to fully incorporate it. This addition is what will help your dark chocolate mousse set beautifully atop the brownie base.
Step 6: Whip the Cream
In a separate bowl, pour in the remaining 1 cup of heavy cream and whip it using an electric mixer until soft peaks form. This stage is essential for creating that airy texture in your mousse. Be careful not to overwhip, as you want the cream to be fluffy and light for the perfect mousse.
Step 7: Combine the Mixtures
Gently fold half of the whipped cream into the chocolate mixture using a spatula. Use cautious, sweeping motions to keep as much air in the mixture as possible. Once combined well, fold in the remaining whipped cream until no white streaks remain. This delicate blending is key to achieving a light and fluffy dark chocolate mousse for your brownies.
Step 8: Assemble and Refrigerate
Spread the luscious chocolate mousse evenly over the cooled brownie base, smoothing the top with a spatula for an even finish. Cover the pan with plastic wrap and refrigerate for at least 1-2 hours, allowing the mousse to set thoroughly. Patience is vital here; the longer it rests, the better the flavor and texture will be!
Step 9: Serve with Garnishes
Once the dark chocolate mousse brownies are set, remove them from the fridge and slice into squares. For a beautiful presentation, garnish with optional toppings like freshly grated white chocolate, a handful of fragrant mint leaves, or a sprinkle of powdered sugar. Fresh berries also make a delightful touch, adding a burst of color and freshness to each serving.
Expert Tips for Dark Chocolate Mousse Brownies
Quality Ingredients: Use high-quality dark chocolate for a rich flavor profile that elevates the entire dessert. Avoid cheap chocolate that can taste waxy.
Bloom Gelatin Properly: Make sure to allow gelatin to bloom for the full 5 minutes. If not bloomed properly, the mousse may not set correctly, leading to a runny texture.
Whip Carefully: When whipping the cream, watch for soft peaks. Overwhipping can lead to a grainy texture, which won’t give you that smooth mousse finish.
Chill Enough: Allow the mousse to chill for at least 1-2 hours. This step is essential for achieving that velvety consistency in your dark chocolate mousse brownies.
Serve with Style: Experiment with garnishes! Fresh berries, mint leaves, and powdered sugar not only enhance flavor but also make for an eye-catching presentation.
Dark Chocolate Mousse Brownies Variations
Make these brownies your own adventure by trying out different twists and substitutions!
-
Gluten-Free: Use a gluten-free brownie mix to enjoy a delicious treat without the gluten.
-
Dairy-Free: Swap heavy cream for coconut cream and use dairy-free chocolate to keep it indulgent yet vegan.
-
Nutty Flavor: Add ½ cup of chopped nuts, like walnuts or pecans, for an extra crunch throughout the brownie base.
-
Minty Refresh: Stir in 1 teaspoon of peppermint extract into the melted chocolate for a refreshing mint chocolate mousse that's simply delightful.
-
Spicy Kick: Incorporate a pinch of cayenne pepper or chili powder into the chocolate mix for a surprising warmth that'll intrigue your taste buds.
-
Decadent Swirls: Before refrigerating, swirl in some peanut butter or almond butter on top for a nutty blend that adds rich layers to your dessert.
-
Fruit Fusion: Fold in ½ cup of pureed raspberries or cherries into the mousse for a fruity twist that beautifully complements the dark chocolate.
-
Extra Chocolatey: Substitute half of the dark chocolate with milk chocolate for a sweeter, creamier flavor profile that's perfect for chocolate lovers!
How to Store and Freeze Dark Chocolate Mousse Brownies
Fridge: Store the brownies in an airtight container for up to 3 days. This keeps the mousse fresh while maintaining its creamy texture.
Freezer: For longer storage, wrap individual brownies tightly in plastic wrap and place them in a freezer-safe bag. They can be frozen for up to 2 months.
Thawing: To enjoy your frozen dark chocolate mousse brownies, thaw them overnight in the fridge. This helps retain their luscious consistency.
Reheating: If you prefer them warm, microwave the brownies for 10-15 seconds before serving—just enough to take the chill off without melting the mousse!
What to Serve with Dark Chocolate Mousse Brownies
Elevate your dessert experience by pairing these luscious brownies with delightful accompaniments that dance on your palate.
- Vanilla Ice Cream: The creamy vanilla flavor perfectly balances the rich chocolate, creating a delightful contrast in every bite.
- Fresh Berries: Strawberries or raspberries add a refreshing tartness that complements the sweet and decadent chocolate layers beautifully.
- Whipped Cream: A fluffy dollop on top enhances the dessert’s overall richness and provides an airy texture to each indulgent bite.
- Espresso: A small cup of rich espresso harmonizes the chocolate's deep notes, offering a sophisticated twist to your dessert moment.
- Mint Leaves: Fresh mint not only adds a pop of color but also invigorates the palate with its crisp, refreshing taste after each rich morsel.
- Chocolate Ganache Drizzle: A warm drizzle of ganache will intensify the chocolate experience, making every bite even more decadent—incredible for chocolate lovers!
- Toasted Nuts: Chopped walnuts or almonds bring a delightful crunch that cuts through the smoothness of the mousse, adding a textural contrast.
- Caramel Sauce: A drizzle of sweet, salty caramel introduces a luscious sweetness, making the brownies feel even more indulgent and exciting.
- Dessert Wine: A glass of sweet dessert wine, like Port or Sauternes, will elegantly enhance the flavors of the chocolate and elevate your overall dining experience.
Make Ahead Options
These Dark Chocolate Mousse Brownies are perfect for busy home cooks looking to save time without compromising on flavor! You can prepare the brownie base up to 3 days in advance; just bake, cool completely, and store them in an airtight container. The chocolate mousse can also be made ahead—simply whip it up and refrigerate it for up to 24 hours. To maintain that delicious texture, cover the mousse tightly with plastic wrap. When you're ready to serve, spread the mousse over the brownie base and refrigerate for an additional hour to set; then just garnish and enjoy! With these make-ahead tips, you’ll have an impressive dessert ready to dazzle your guests without the last-minute rush!
Dark Chocolate Mousse Brownies Recipe FAQs
What type of dark chocolate should I use for the mousse?
Absolutely! Opt for high-quality dark chocolate with at least 60-70% cocoa content. This will give your mousse a deep and rich flavor. Brands like Ghirardelli or Callebaut are fantastic choices. Trust me; the better the chocolate, the more decadent your brownies will be!
How should I store leftovers of the brownies?
You can store the brownies in an airtight container in the fridge for up to 3 days. This will keep the mousse fresh and maintain its creamy texture. If you notice a change in smell or the mousse develops excess moisture, it’s best to consume them sooner rather than later.
Can I freeze dark chocolate mousse brownies, and if so, how?
Yes, you can! For freezing, wrap individual brownies tightly in plastic wrap, then place them in a freezer-safe bag. They can be stored in the freezer for up to 2 months. When you’re ready to enjoy them, simply thaw overnight in the fridge. This helps maintain their luscious texture!
What should I do if my mousse doesn’t set properly?
If your mousse is too runny, it’s often due to the gelatin not blooming correctly or being added when the chocolate mixture is too hot. Ensure you bloom your gelatin for a full 5 minutes and let the chocolate mixture cool slightly before mixing in the gelatin. Don't worry; if it doesn’t set in the fridge after a couple of hours, you can re-whip some cream and gently fold it in to lighten it up again!
Are these brownies safe for special diets or allergies?
Great question! The recipe does contain dairy and gluten, so they aren’t suitable for a vegan or gluten-free diet without substitutions. You could try using a gluten-free brownie mix and non-dairy cream alternatives for the mousse. Always double-check labels for allergens, especially if serving to guests with specific dietary restrictions.
How can I enhance the flavors of my Dark Chocolate Mousse Brownies?
Adding a sprinkle of sea salt on top before serving elevates the chocolate flavor, balancing out the sweetness beautifully. You might also consider infusing the heavy cream with flavors like espresso or orange zest while heating it—these subtle nuances can transform your brownies into something even more extraordinary!
Dark Chocolate Mousse Brownies
Equipment
- Oven
- mixing bowls
- spatula
- electric mixer
- Saucepan
- heatproof bowl
- Baking pan
Ingredients
For the Brownies
- 1 box brownie mix use your favorite brand
- ½ cup heavy cream adds richness
For the Mousse
- 2 teaspoons unflavored gelatin helps the mousse set
- 2 tablespoons cold water used to bloom the gelatin
- 1 cup heavy cream whipped for mousse
- 8 ounces dark chocolate high quality for best flavor
For Garnishing
- white chocolate optional, grated
- fresh berries optional, for freshness
- mint leaves optional, for garnish
- powdered sugar optional, for elegance
Instructions
Preparation Steps
- Preheat your oven according to the box brownie mix instructions. Prepare the mix and pour it into a greased baking pan. Bake until a toothpick inserted comes out clean.
- Melt the dark chocolate in a heatproof bowl over simmering water, stirring until smooth. Set aside to cool slightly.
- Sprinkle gelatin over cold water in a small dish and let it bloom undisturbed for about 5 minutes.
- Heat ½ cup of heavy cream in a saucepan until it bubbles, then pour over the melted chocolate and mix well.
- Warm the bloomed gelatin until fully dissolved and add it to the chocolate mixture, stirring to combine.
- In a separate bowl, whip 1 cup of heavy cream until soft peaks form. Be careful not to overwhip.
- Gently fold half of the whipped cream into the chocolate mixture, then fold in the remaining whipped cream until no white streaks remain.
- Spread the chocolate mousse over the cooled brownie base and refrigerate for 1-2 hours to set.
- Slice into squares and garnish with white chocolate, fresh berries, mint leaves, or powdered sugar as desired.