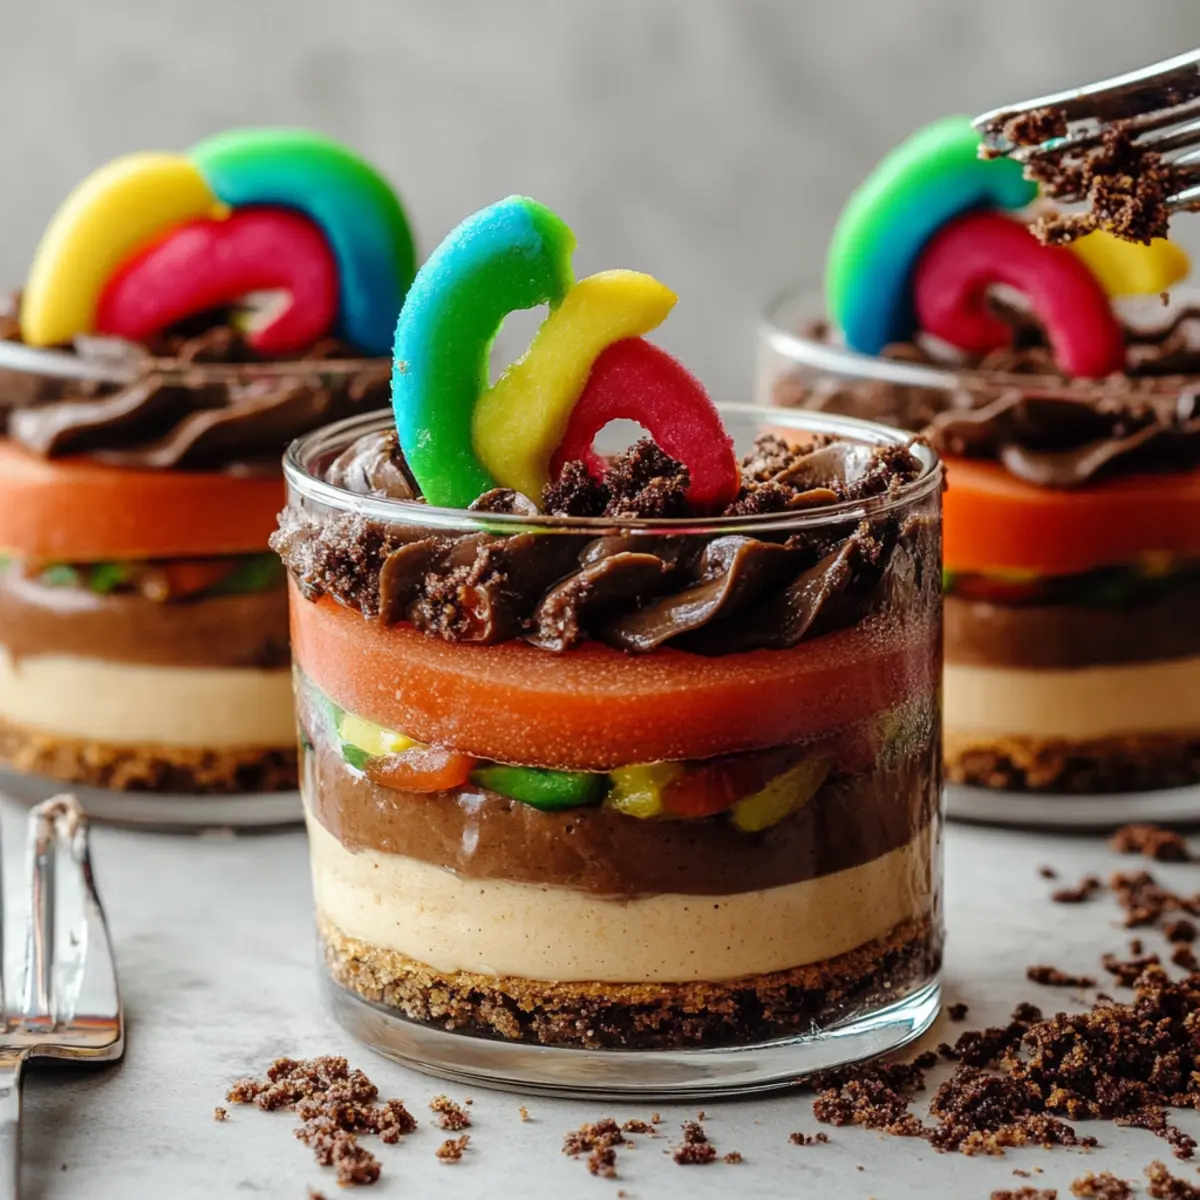
As I watched my kids digging excitedly into their dessert, it struck me how a simple treat could create such joy. Our Creamy Chocolate Dirt Pudding has become a favorite in our household, and I bet it will be in yours too! This delightful no-bake recipe brings together instant chocolate pudding, fluffy whipped topping, and crunchy Oreo cookies, making it not just easy but a guaranteed crowd-pleaser. Within just 10 minutes of prep, you can create this whimsical layered dessert, perfect for family gatherings or a quick indulgence after a long day. What’s more? It’s vegetarian-friendly and a fun way to get creative in the kitchen. So, are you ready to transform your dessert game with this tasty, playful pudding?
Why is this dessert so delightful?
Joyful, Fun Presentation: The layered look of Chocolate Dirt Pudding is not only eye-catching but also invites curiosity from everyone at the table.
Effortless Preparation: With just 10 minutes of prep time and no baking required, you can whip this up on a whim, making it the perfect last-minute treat.
Rich, Creamy Flavor: The combination of chocolate pudding and whipped topping delivers a decadent taste, while Oreo crumbs add a satisfying crunch.
Kid-Friendly Fun: Topping it off with gummy worms makes this dessert a hit with kids and adults alike—it's playful and tasty!
Versatile Serving Options: Whether you serve it in a large dish or individual cups, this pudding is an adaptable dessert that fits any occasion.
Prepare to fall in love with this creamy, nostalgic treat!
Creamy Chocolate Dirt Pudding Ingredients
Get ready to dig into this delight!
For the Pudding
- Cold milk – 2 cups of cold milk is essential for achieving that rich pudding consistency.
- Instant chocolate pudding mix – This is the star ingredient that provides the chocolatey goodness in your creamy chocolate dirt pudding.
- Whipped topping – 1 container adds a fluffy sweetness to your dessert, making it incredibly light and airy.
For the Crunchy Layer
- Oreo cookies – 1 package brings the delightful crunch and cookie flavor; feel free to use any chocolate sandwich cookies you love!
For the Topping
- Gummy worms – Adding a fun touch, these are perfect for creating that playful “dirt” effect and making your dessert even more inviting!
Now that you have the ingredients ready, let's embark on the joyful journey of crafting this creamy chocolate dirt pudding that's sure to delight all who dare to indulge!
Step‑by‑Step Instructions for Creamy Chocolate Dirt Pudding
Step 1: Whisk the Pudding
In a large mixing bowl, combine 2 cups of cold milk with the instant chocolate pudding mix. Using a whisk, mix vigorously for about 2 minutes until the mixture thickens and becomes smooth. You’ll know it's ready when it coats the back of a spoon and holds its shape. Set aside to let it firm up, about 5 minutes.
Step 2: Crush the Cookies
While the pudding is setting, take your package of Oreo cookies and place them in a zip-top bag. Use a rolling pin to crush them until you have a mix of fine crumbs and small chunks. If you prefer, you can use a food processor for this step, pulsing the cookies until you achieve your desired texture.
Step 3: Fold in the Whipped Topping
Once the pudding is set and thick, gently fold in the container of whipped topping using a rubber spatula. This should take about 1–2 minutes, ensuring the two mixtures are well combined and light. The final result should be airy and creamy, perfectly embodying the decadent richness of your Creamy Chocolate Dirt Pudding.
Step 4: Layer the Dessert
Now it's time to assemble! In a serving dish or individual cups, start by spooning a layer of the chocolate pudding mixture, spreading it evenly across the bottom. Follow this with a layer of crushed Oreo cookies to mimic “dirt.” Repeat this layering process until you reach the top of your dish, ending with a layer of the pudding.
Step 5: Add the Gummy Worms
To give your Creamy Chocolate Dirt Pudding a fun finish, sprinkle gummy worms on top of the final pudding layer. Arrange them playfully as if they’re crawling out of the dirt, adding a touch of whimsy to your dessert.
Step 6: Chill Before Serving
Cover your dessert with plastic wrap and refrigerate it for at least one hour before serving. This chilling time allows the flavors to meld and the pudding to set up beautifully. When ready to serve, pull it out of the fridge and enjoy a visually stunning and delicious treat!

Creamy Chocolate Dirt Pudding Variations
Feel free to mix and match these ideas for your own delicious twist on this classic dessert!
-
Nut-Free: Substitute crushed graham crackers for Oreos to keep it nut-free while still providing that crunchy texture.
-
Gluten-Free: Use gluten-free chocolate sandwich cookies to create the same delightful crunch, perfect for gluten-sensitive friends and family.
-
Dairy-Free: Swap cold milk for almond milk and use non-dairy whipped topping for a creamy treat everyone can enjoy.
-
Extra Chocolatey: Add chocolate syrup between the layers for a rich chocolate flavor that will delight chocolate lovers.
-
Fruit-Infused: Toss in some fresh raspberries or strawberries between the layers for a burst of fruity flavor that brightens each bite.
-
Layered Delight: Use layers of chocolate mousse instead of pudding to introduce a gourmet texture, elevating this dessert to a whole new level!
-
Spicy Kick: Sprinkle a bit of cinnamon or cayenne pepper in the chocolate pudding for a surprising warm kick that enhances the flavors wonderfully.
-
Nutty Boost: Fold in crushed nuts like pecans or walnuts into the pudding for a delightful crunch and added depth to your dessert.
Turn up the fun and creativity in your kitchen with these simple variations to your Creamy Chocolate Dirt Pudding!
What to Serve with Creamy Chocolate Dirt Pudding
Elevate your dessert experience with these delightful pairings that balance sweetness and texture perfectly.
-
Fresh Berries: Their tartness contrasts beautifully with the sweetness of the dirt pudding, adding a pop of color and freshness.
-
Vanilla Ice Cream: A scoop of creamy vanilla ice cream adds a rich, luscious temperature contrast to the pudding’s texture.
-
Chocolate Dipped Fruit: Strawberries or bananas dipped in chocolate will echo the pudding’s chocolatey flavor while providing a fun, fruity element.
-
Nutty Brownies: Pairing with fudgy brownies introduces a chewy texture that complements the creamy pudding decadently. It’s like a chocolate lover’s dream come true!
-
Whipped Cream: A light dollop enhances the creaminess, creating an inviting presentation that makes every bite feel indulgent.
-
Milkshake: A chocolate or vanilla milkshake serves as a delightful, sippable companion to your pudding, enhancing the playful vibe of the dessert.
-
Sparkling Water: For a refreshing beverage, serve sparkling water with a twist of lemon to cleanse the palate between sweet bites.
-
Chocolate Mint Cookies: These cookies add a minty freshness and crunchy texture, making them a perfect sweet sidekick to the rich pudding.
-
Chocolate-Covered Pretzels: The salty crunch of pretzels pairs delightfully against the sweet, creamy pudding, adding an intriguing flavor contrast that tantalizes the taste buds.
Make Ahead Options
Preparing your Creamy Chocolate Dirt Pudding ahead of time is a fantastic way to save precious moments on busy days! You can make the pudding mix up to 24 hours in advance by whisking the cold milk with the instant chocolate pudding mix and then folding in the whipped topping. Just store it in an airtight container in the refrigerator to keep it fresh and creamy. The crushed Oreo cookies can also be prepared ahead of time; simply store them in a separate bag to maintain their crunchiness. When it’s time to serve, layer the pudding and cookies in your dish, add the playful gummy worms, and enjoy a delightful, hassle-free dessert that’s just as delicious as when freshly made!
How to Store and Freeze Creamy Chocolate Dirt Pudding
-
Fridge: Keep your Creamy Chocolate Dirt Pudding covered in the fridge for up to 3 days. This ensures it stays fresh and maintains its delightful texture.
-
Freezer: For longer storage, you can freeze individual servings in airtight containers for up to 1 month. When ready to enjoy, thaw overnight in the fridge.
-
Reheating: Since this dessert is best served chilled, there's no reheating required. Just pull it from the fridge or freezer and let it sit at room temperature for 15 minutes before serving for optimal texture.
Expert Tips for Creamy Chocolate Dirt Pudding
-
Use Cold Milk: Make sure your milk is cold for the best pudding consistency—this helps the mix thicken perfectly.
-
Crush Carefully: Don’t over-crush the Oreo cookies; aim for a mix of fine crumbs and small chunks to add texture and fun to your creamy chocolate dirt pudding.
-
Gentle Folding: When combining the pudding and whipped topping, fold gently to keep the airy texture intact, ensuring a light dessert everyone will adore.
-
Chill Time Counts: Don't skip the chilling step! Allowing the pudding to set in the fridge for at least one hour enhances the flavors and texture significantly.
-
Fun Presentation: Get creative with your gummy worm placement; they can "crawl" out of the dirt for a playful presentation that will wow both kids and adults!

Creamy Chocolate Dirt Pudding Recipe FAQs
How do I select the right cold milk for this recipe?
Absolutely! For the best results, use whole or 2% milk, as they provide a creamier texture to the pudding. If you're lactose intolerant or prefer a dairy-free option, oat milk or almond milk can also work well—just make sure they are unsweetened to maintain the dessert's balance.
Can I store leftovers of Creamy Chocolate Dirt Pudding?
Yes, you can! Store your Creamy Chocolate Dirt Pudding in an airtight container in the refrigerator for up to 3 days. Just be sure to cover it well to prevent it from absorbing any odors from the fridge.
How do I freeze Creamy Chocolate Dirt Pudding?
Very! To freeze, scoop individual servings into airtight containers. Be sure to leave a little space at the top, as the pudding may expand. It can be frozen for up to 1 month. When you’re ready to enjoy it, simply transfer a container to the fridge to thaw overnight. This ensures the pudding retains its creamy texture!
What if my pudding doesn’t thicken properly?
If your pudding isn’t thickening as expected, ensure you're whisking for a full 2 minutes as specified in the instructions. If it's still too runny after that, it might need a bit more time to set. Allow it to rest for another 5 to 10 minutes and check again. Occasionally, if the milk was too warm, it can prevent the pudding from thickening, so be sure it's cold!
Is this Creamy Chocolate Dirt Pudding safe for allergies?
Check the ingredients! This recipe contains dairy and gluten, as Oreos do have wheat. If you have guests with allergies, consider using a gluten-free chocolate sandwich cookie option and swapping the whipped topping for dairy-free alternatives. Always read labels to ensure safety for those with dietary restrictions!

Indulgent Creamy Chocolate Dirt Pudding Everyone Will Love
Equipment
- mixing bowl
- whisk
- Rolling Pin
- Rubber spatula
- zip-top bag
- Serving dishes or cups
Ingredients
For the Pudding
- 2 cups Cold milk Essential for rich pudding consistency.
- 1 package Instant chocolate pudding mix Star ingredient for chocolatey goodness.
- 1 container Whipped topping Adds fluffy sweetness and light texture.
For the Crunchy Layer
- 1 package Oreo cookies Delightful crunch and cookie flavor.
For the Topping
- 1 package Gummy worms Adds a playful 'dirt' effect.
Instructions
Step‑by‑Step Instructions
- In a large mixing bowl, combine 2 cups of cold milk with the instant chocolate pudding mix. Whisk for about 2 minutes until thickened.
- While the pudding is setting, crush the Oreo cookies in a zip-top bag using a rolling pin or food processor.
- Gently fold the whipped topping into the pudding mixture until well combined and airy.
- In serving dishes or cups, layer the pudding mixture and crushed Oreo cookies, mimicking 'dirt'.
- Sprinkle gummy worms on top of the final pudding layer for a fun finish.
- Cover and refrigerate for at least one hour before serving to enhance flavors.