On an ordinary afternoon, my kitchen transformed into a lively hub filled with laughter and the alluring scent of sweet treats. As I prepared to create the delicate and delightful Shiratama Dango, I felt the excitement build—this is no ordinary snack. With just a handful of ingredients and only 15 minutes of your time, you can whip up these charming little rice dumplings that are perfect for any occasion. The best part? Not only are they a fun project to make with family or friends, but they also offer a blank canvas for your favorite toppings, from rich dark brown sugar syrup to creamy ice cream. Curious about how to bring a taste of Japanese culture into your home? Let’s dive into this delightful journey together!

Why is Shiratama Dango So Special?
Simplicity meets satisfaction: With just four ingredients and 15 minutes, you can craft these delightful treats.
Versatile toppings: From rich syrup to ice cream, you can personalize every bite.
Fun to make: Involve your family or friends for a joyful kitchen experience!
Cultural charm: Experience a taste of Japanese tradition right at home.
Crowd-pleaser: Perfect for parties or casual snacking, everyone will love them!
Enjoy the magical process of making Shiratama Dango and relishing its unique taste.
Shiratama Dango Ingredients
For the Dango
• Glutinous rice flour – 100 g; this is the star ingredient that gives Shiratama Dango its unique chewy texture.
• Water – 50-70 ml; adjust to achieve a smooth, elastic dough.
• Potato starch – 1-2 tablespoon (if using mochiko); this helps in binding and rolling if you go with the mochiko method.
For the Toppings
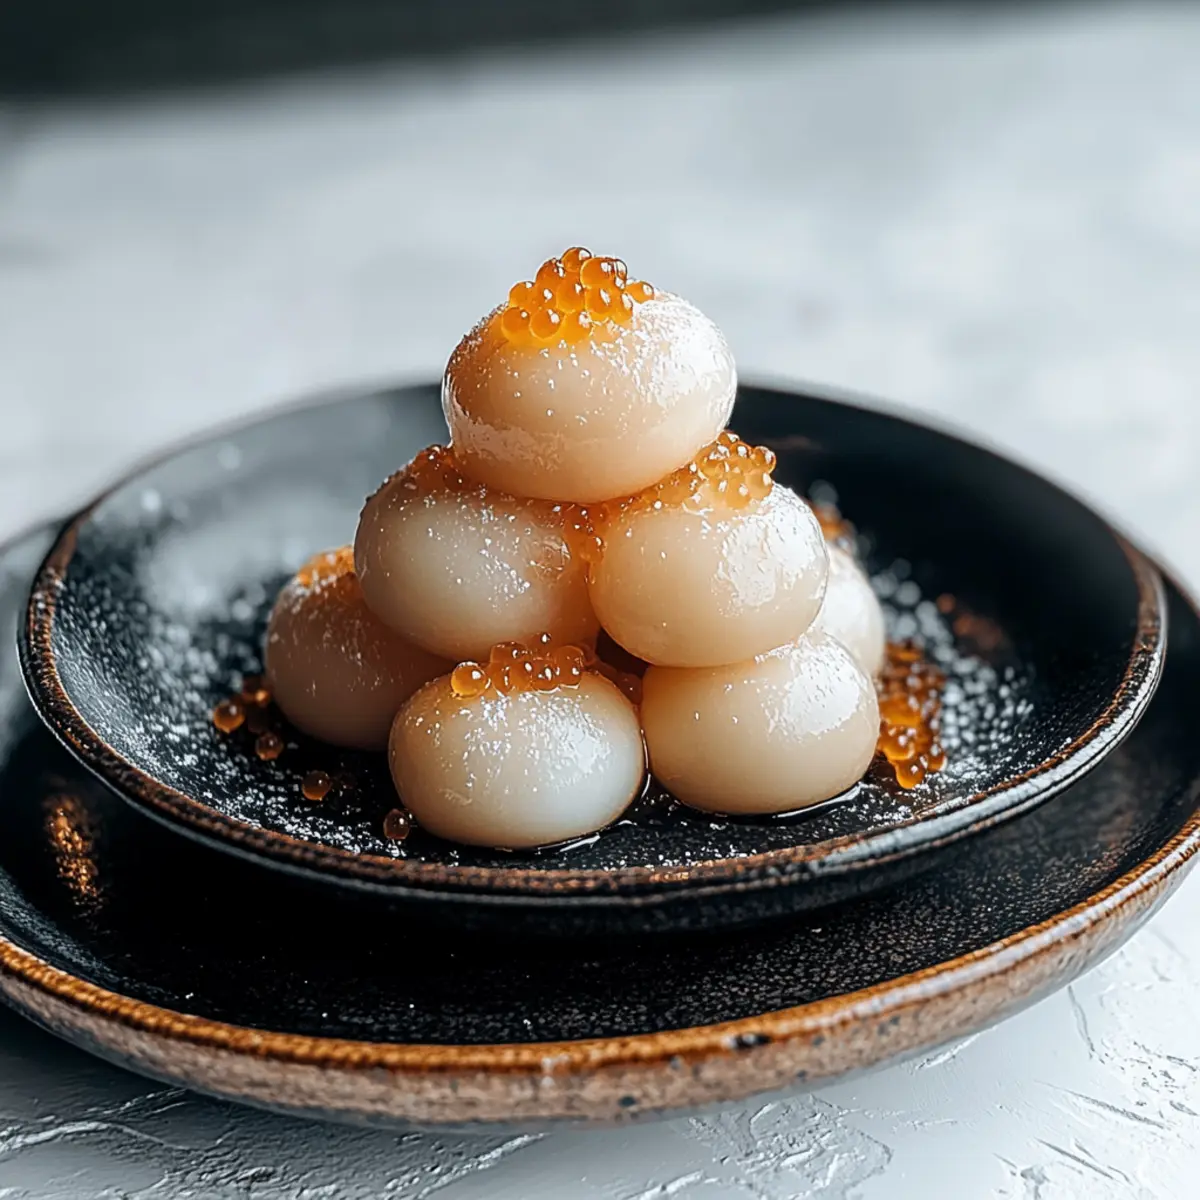
• Dark brown sugar syrup (kuromitsu) – drizzle over the dango for a rich, sweet finish.
• Roasted soybean powder (kinako) – a wonderful, earthy option that adds a nutty flavor.
• Ice cream – for a delightful twist, pair the dango with your favorite flavor for an indulgent treat!
Dive into the charm of making your own Shiratama Dango at home!
Step‑by‑Step Instructions for Shiratama Dango
Step 1: Prepare the Dough
In a mixing bowl, whisk 100 g of glutinous rice flour until lump-free. Gradually pour in 50-70 ml of water, incorporating it slowly. Mix gently with a spatula until the ingredients combine. You'll achieve a smooth, elastic dough that's slightly tacky—this should take about 2-3 minutes. If you're following the mochiko method, mix in 1-2 tablespoon of potato starch before adding the water.
Step 2: Shape the Dango
Once your dough for the Shiratama Dango is ready, divide it into equal portions. Roll each portion into a cylinder, then cut each cylinder into about ten pieces, creating small segments. Take each segment and roll it into a round ball, pressing a small indentation in the center with your thumb. This shapes the dango and helps with cooking evenly.
Step 3: Prepare for Cooking
To prevent the dango from sticking together, lay them on a sheet of parchment paper. Ensure they are spaced apart to avoid clumping. While doing this, bring a large pot of water to a rolling boil. This step is crucial, as the boiling water will help the dango achieve that delightful chewy texture we love.
Step 4: Cook the Dango
Gently drop the prepared dango into the boiling water, using chopsticks to stir them occasionally. Keep a close watch, as you want to cook them for about 3 minutes. When the dango float to the surface, they're ready, signaling that they're perfectly cooked. Allow them to cook for an additional minute for that ideal texture.
Step 5: Chill the Dango
Using a slotted spoon, carefully transfer the dango to a bowl filled with ice-cold water. This will halt the cooking process and set their chewy texture. Let them chill for about 5 to 10 minutes; this cooling phase is essential for achieving the right firmness before serving.
Step 6: Serve or Store
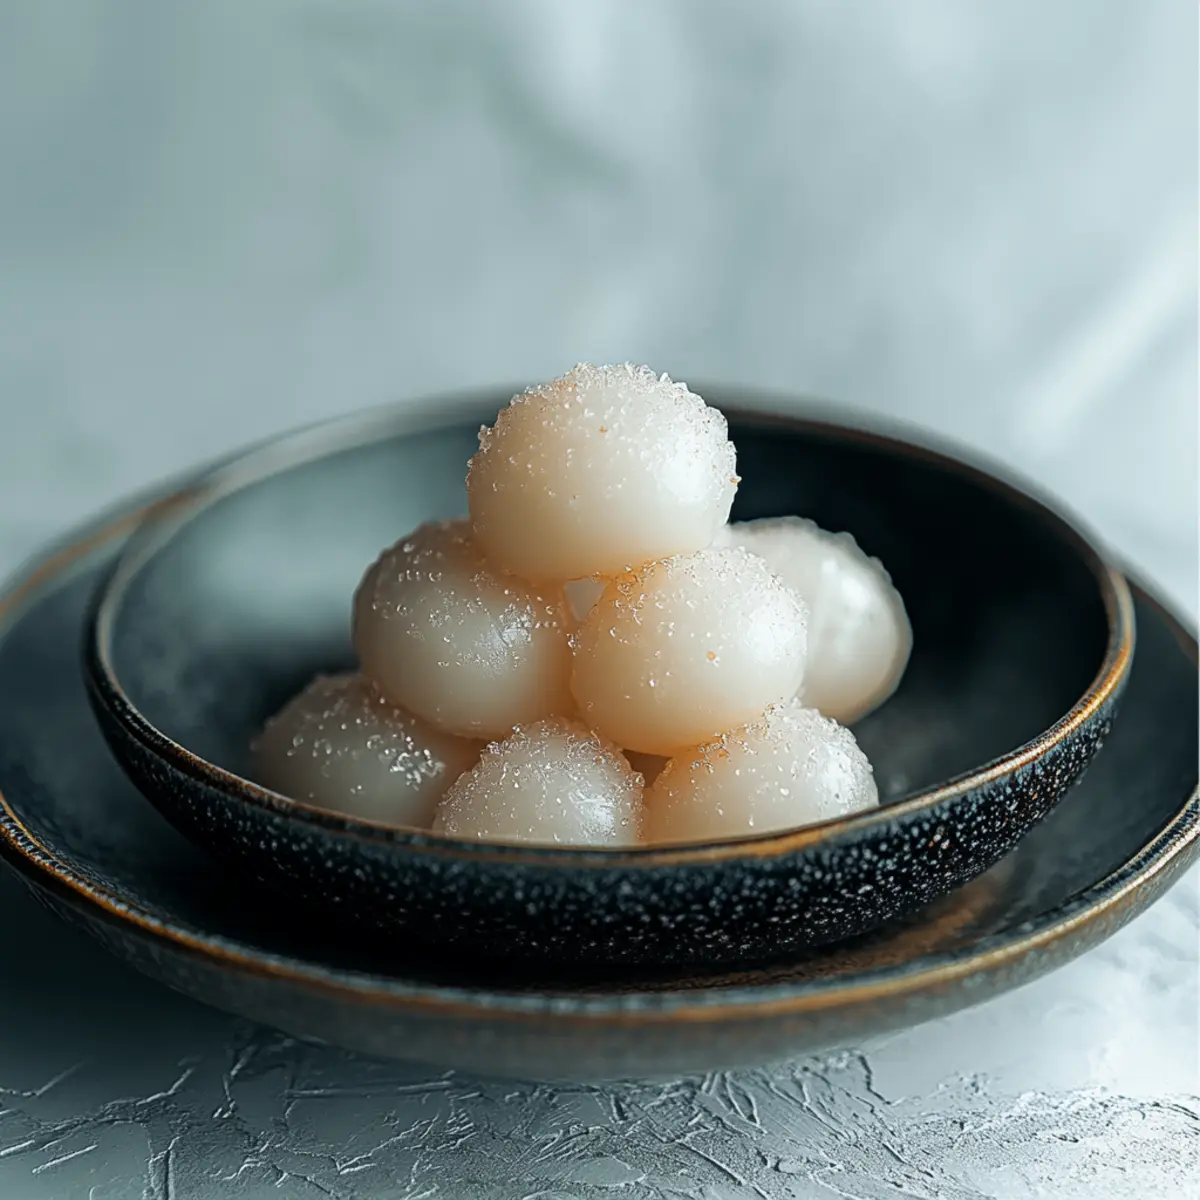
After chilling, drain the dango thoroughly, and they’re ready to enjoy. Serve them with your toppings of choice like dark brown sugar syrup, roasted soybean powder, or even a scoop of ice cream. If you wish to store leftovers, freeze the extra dango on a parchment-lined tray for about an hour before transferring them to a freezer-safe bag. Enjoy making and sharing your delicious Shiratama Dango!
Shiratama Dango Variations & Substitutions
Feel free to get creative and make this Shiratama Dango uniquely yours; let your taste buds lead the way!
- Gluten-Free: Substitute glutinous rice flour with sweet rice flour for a deliciously chewy alternative.
- Vegan: Use maple syrup or agave nectar instead of dark brown sugar syrup for a plant-based treat.
- Fruit-Infused: Add a splash of fruit juice or puree (like matcha or strawberry) into the dough for added flavor and color.
- Nutty Twist: Mix in a tablespoon of ground nuts like almond or cashew for an aromatic, crunchy texture.
- Savory Option: Try using soybean flour (kinako) as a savory dust instead of sweet toppings for a unique side dish. Discover a whole new layer of dango joy!
- Coconut Flavor: Incorporate coconut milk instead of water for a tropical twist that elevates the sweetness.
- Spicy Kick: Add a hint of chili powder or cayenne to your toppings for a delightful spicy twist that complements the sweetness.
- Layered Delight: Stack your dango with ice cream and fresh fruit to create an irresistible parfait that’s perfect for warm days.
Get ready to explore the endless possibilities that Shiratama Dango has to offer!
Make Ahead Options
Making Shiratama Dango is perfect for busy home cooks who want to save time without sacrificing flavor! You can prepare the dango dough up to 24 hours in advance by mixing the glutinous rice flour and water and shaping the balls, then refrigerate them in an airtight container. To maintain their delightful texture, spread them out on a parchment-lined tray to prevent sticking. When you’re ready to cook, simply drop the cold dango into boiling water and continue with the recipe as usual; they’ll be just as delicious and chewy! If you have leftover dango, freeze them after chilling for up to 3 months, ensuring you enjoy these treats whenever you crave a sweet and satisfying snack!
How to Store and Freeze Shiratama Dango
Fridge: Store the dango in an airtight container for up to 3 days. This keeps them fresh while maintaining their delicate chewy texture.
Freezer: For long-term storage, freeze the extra dango on a parchment-lined tray for about an hour, then transfer them to a freezer-safe bag. They can be kept frozen for up to 2 months.
Reheating: When ready to enjoy, steam or boil the frozen dango for about 3-4 minutes to revive their delightful texture. Remember, Shiratama Dango is best served fresh!
What to Serve with Shiratama Dango
Imagine the joy of creating a delightful meal around these charming little rice dumplings that tantalize your taste buds.
- Matcha Tea: The earthy notes of matcha provide a refreshing contrast to the sweetness of the dango, perfectly balancing flavors.
- Fruit Salad: A colorful mix of seasonal fruits adds freshness and tang, making your dessert experience more vibrant and enjoyable.
- Roasted Sweet Potatoes: Tender and slightly sweet, they offer a warm, comforting pairing with the chewy dango, enhancing the overall taste profile.
- Mochi Ice Cream: This delightful addition complements the chewy texture of dango while adding a creamy, indulgent twist to your dessert table.
- Tempura Vegetables: The crunchiness of tempura adds an exciting texture contrast that can elevate your dango experience, creating a satisfying meal.
- Sweetened Soy Milk: A warm bowl of sweetened soy milk provides a creamy and comforting side, harmonizing beautifully with the dango's chewy goodness.
- Green Salad: A light and zesty salad adds a refreshing touch, cutting through the sweetness and creating a balanced dining experience.
Tips for the Best Shiratama Dango
-
Proper Dough Consistency: Ensure your dough is smooth and elastic. If it's too dry, add a tiny bit more water until you reach the right texture.
-
Even Sizing: Roll your dango pieces into uniform sizes. This helps them cook evenly, ensuring perfect chewiness in every bite.
-
Temperature Check: Boil the water properly before adding the dango; this step is vital for that ideal texture.
-
Cooling Time Is Key: Don’t skip the ice-cold water bath after cooking; it locks in the chewiness and makes them even more delightful.
-
Experiment with Toppings: Feel free to mix and match! Find your favorite Shiratama Dango topping combination to keep things exciting.
Shiratama Dango Recipe FAQs
What type of rice flour should I use for Shiratama Dango?
Absolutely! The best option is glutinous rice flour, typically labeled as shiratama-ko or mochiko. This type of flour provides the chewy texture that makes Shiratama Dango so delightful. Ensure that it’s labeled as glutinous to achieve that wonderful consistency.
How do I store leftover Shiratama Dango?
For optimal freshness, store the dango in an airtight container in the fridge for up to 3 days. This storage method keeps them chewy and delightful, ensuring you can enjoy your sweet treat for a little longer!
Can I freeze Shiratama Dango?
Very! To freeze, start by laying the dango on a parchment-lined tray and place it in the freezer for about an hour to firm up. Once frozen, transfer them to a freezer-safe bag. They can stay in the freezer for up to 2 months. Just remember to steam or boil them for about 3-4 minutes when you're ready to enjoy them again!
What should I do if my dango dough is too dry?
If your dough is not holding together well and seems dry, don’t worry! Simply add a tiny bit more water, a teaspoon at a time, mixing gently after each addition. You want to achieve a smooth and elastic texture—a little moisture goes a long way!
Can I use Shiratama Dango for special dietary needs?
Absolutely! Shiratama Dango is gluten-free if you stick to glutinous rice flour. However, if you or your guests have allergies, especially concerning the toppings (like certain ice creams or syrups), it's wise to check those ingredients carefully. Additionally, I encourage experimenting with various toppings like fruit or vegan options to suit different dietary preferences.
How can I tell when the dango is properly cooked?
Great question! The dango will float to the surface of the boiling water after about 3 minutes, which is a sure sign they are nearly done. Allow them to cook for an additional minute for perfect texture, then cool them in ice water. This process maintains that lovely chewiness and stops the cooking instantly!
Delicious Shiratama Dango: Easy Homemade Sweet Treats
Equipment
- mixing bowl
- Pot
- spatula
- slotted spoon
- parchment paper
Ingredients
For the Dango
- 100 g glutinous rice flour the main ingredient for chewy texture
- 50-70 ml water adjust for dough consistency
- 1-2 tablespoon potato starch optional, helps with binding if using mochiko
For the Toppings
- dark brown sugar syrup (kuromitsu) drizzle over the dango
- roasted soybean powder (kinako) adds a nutty flavor
- ice cream pair with your favorite flavor
Instructions
Step-by-Step Instructions
- In a mixing bowl, whisk 100 g of glutinous rice flour until lump-free.
- Gradually pour in 50-70 ml of water and mix gently with a spatula until combined into a smooth dough.
- Divide the dough into equal portions, roll into cylinders, and cut into small pieces.
- Roll each piece into a round ball, pressing a small indentation in the center.
- Lay the dango on parchment paper to prevent sticking while bringing a large pot of water to a boil.
- Gently drop the dango into boiling water and stir occasionally, cooking for 3-4 minutes until they float.
- Transfer the dango to ice-cold water to halt cooking and set their texture for 5-10 minutes.
- Drain and serve with your choice of toppings or freeze leftovers for later enjoyment.