As I stared at the jumble of ingredients sprawled across my kitchen counter, I felt an unexpected thrill. Today was all about crafting the perfect Mini Cheesecakes, and I knew they would be a game changer at my next gathering. Not only are these delightful little treats easy to whip up, they also offer a beautiful personal touch that transforms any occasion into something extra special. With no need for a towering cake, these single-serving desserts promise a creamy and indulgent experience without the fuss. Plus, they store wonderfully in your fridge, making them the perfect make-ahead option for busy bakers like us. Ready to dive into the world of these charming cheesecakes? Let’s get started on this delectable journey!
Why Are These Mini Cheesecakes Irresistible?
Creamy Delight: The velvety cream cheese filling melds beautifully with a buttery biscuit base, creating a rich flavor reminiscent of Grandma’s kitchen.
Grab-and-Go Convenience: These charming mini desserts are portion-controlled, making them perfect for parties or a quick snack.
Easy to Make: With just a handful of ingredients and straightforward steps, you’ll whip these up in no time—ideal for kitchen novices and pros alike!
Customizable Toppings: Top with your favorite fruits or a sprinkle of icing sugar, letting your creativity shine while catering to different tastes.
Make-Ahead Magic: Chill them overnight for effortless entertaining; simply pull them out when you're ready, impressing your guests with minimal effort!
Crowd-Pleasing Appeal: These Mini Cheesecakes are sheer bliss for any gathering, making them the ultimate treat that everyone will love.
Mini Cheesecake Ingredients
For the Crust
• Digestive biscuits or graham cracker squares – These form the perfect crumbly base with a delightful crunch.
• Unsalted butter – Adds richness; make sure it's melted for even mixing.
• Caster sugar – Sweetens the crust, balancing the flavors beautifully.
• Cinnamon powder (optional) – A pinch enhances warmth, making the crust more aromatic.
• Salt – Just a pinch elevates all the flavors and adds depth.
For the Filling
• Cream cheese – Use block cream cheese for a rich and smooth filling at room temperature.
• Plain flour – Helps to stabilize the filling, ensuring it sets perfectly.
• Vanilla extract – Adds depth and enhances the overall flavor of the cheesecakes.
• Sour cream (or plain yogurt) – Provides tanginess and contributes to a creamy texture.
• Caster sugar – Sweetens the filling; adjust to taste depending on your preference.
• Lemon zest – Brightens the flavor profile; a touch goes a long way!
• Eggs – Ensure they're at room temperature for the best mixing.
For the Topping
• Thickened or heavy cream – Whip this until thick to create a luxurious topping.
• Vanilla extract (for topping) – Enhances the whipped cream with a lovely aroma.
• Icing sugar or caster sugar – Sweetens the whipped cream; sprinkle for a touch of finesse.
Optional Decorations
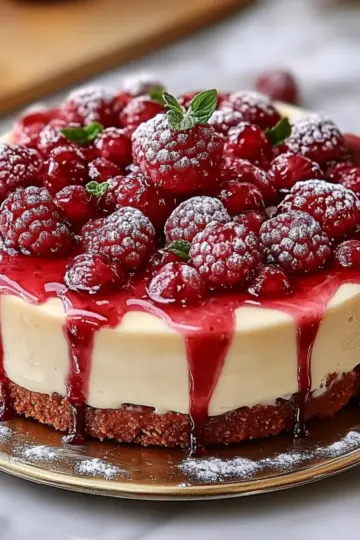
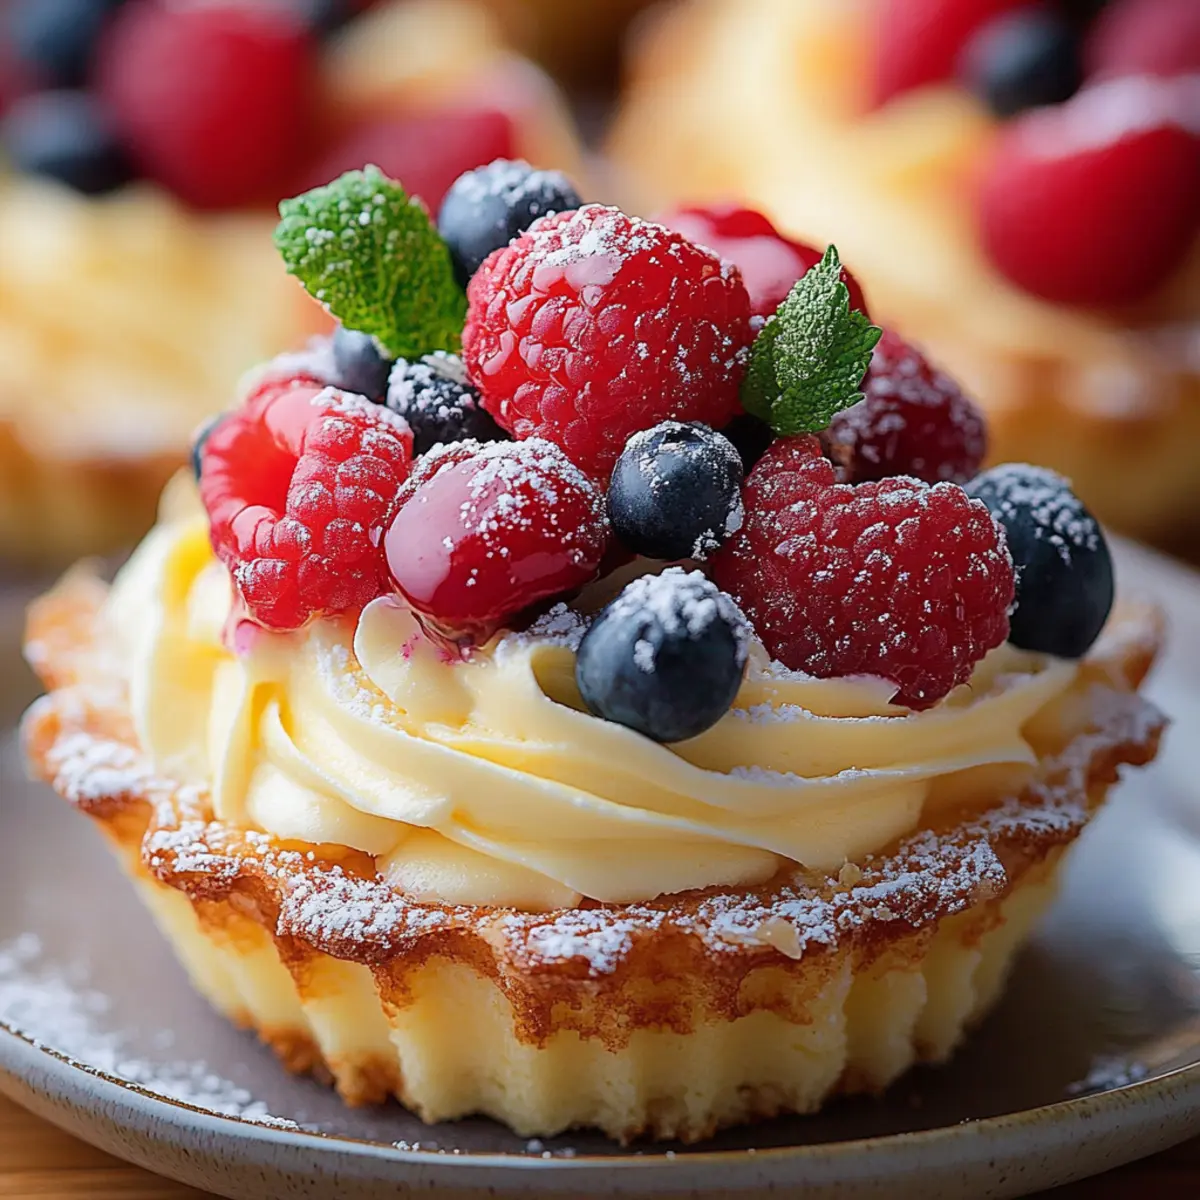
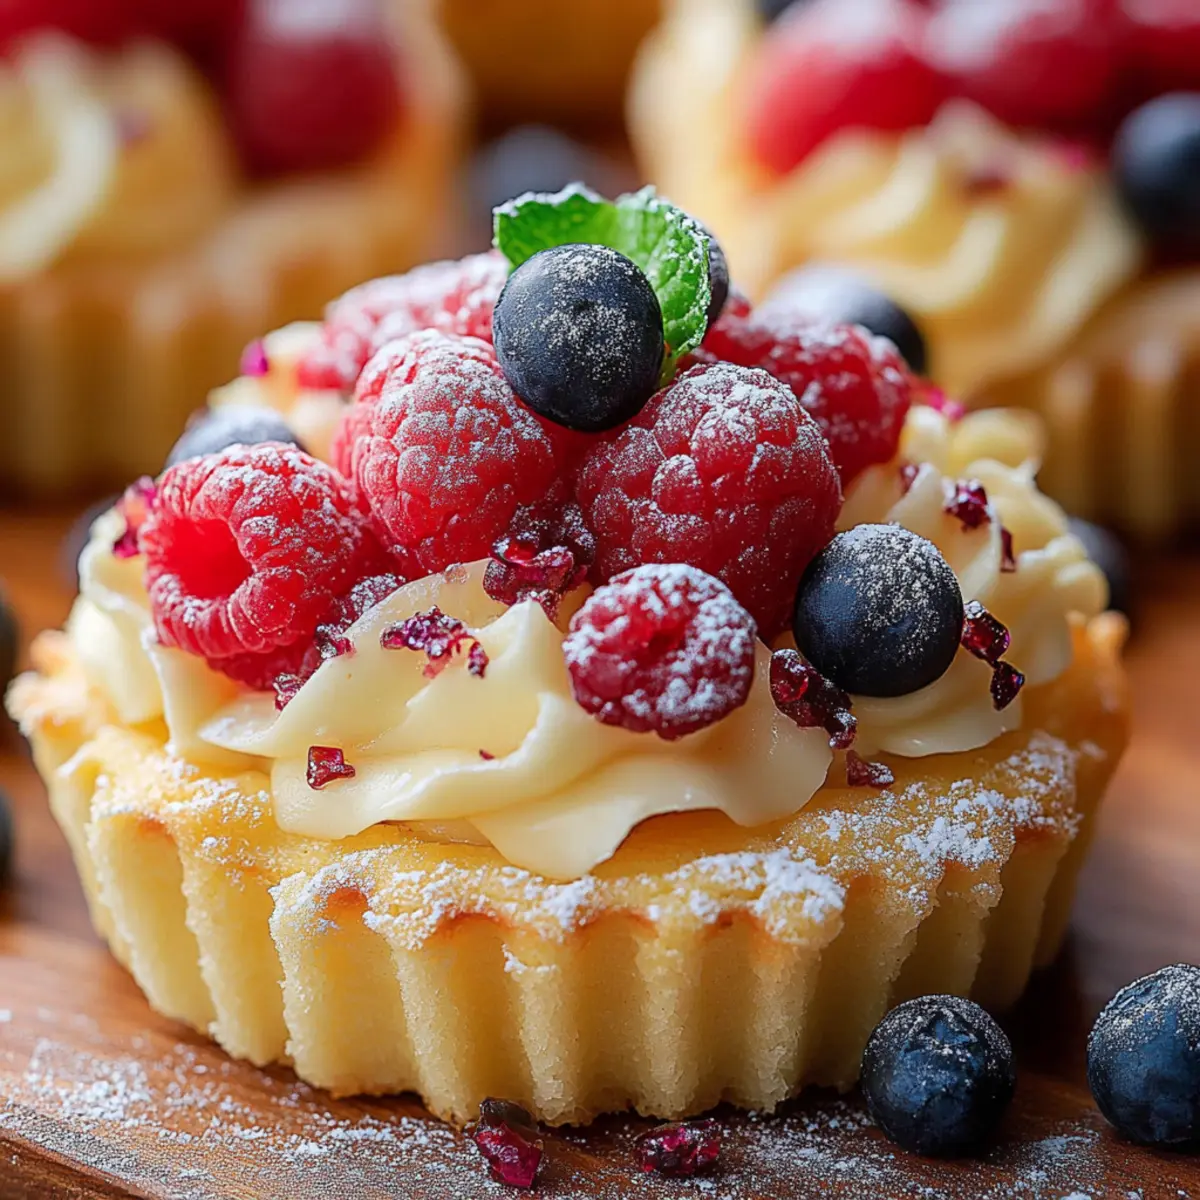
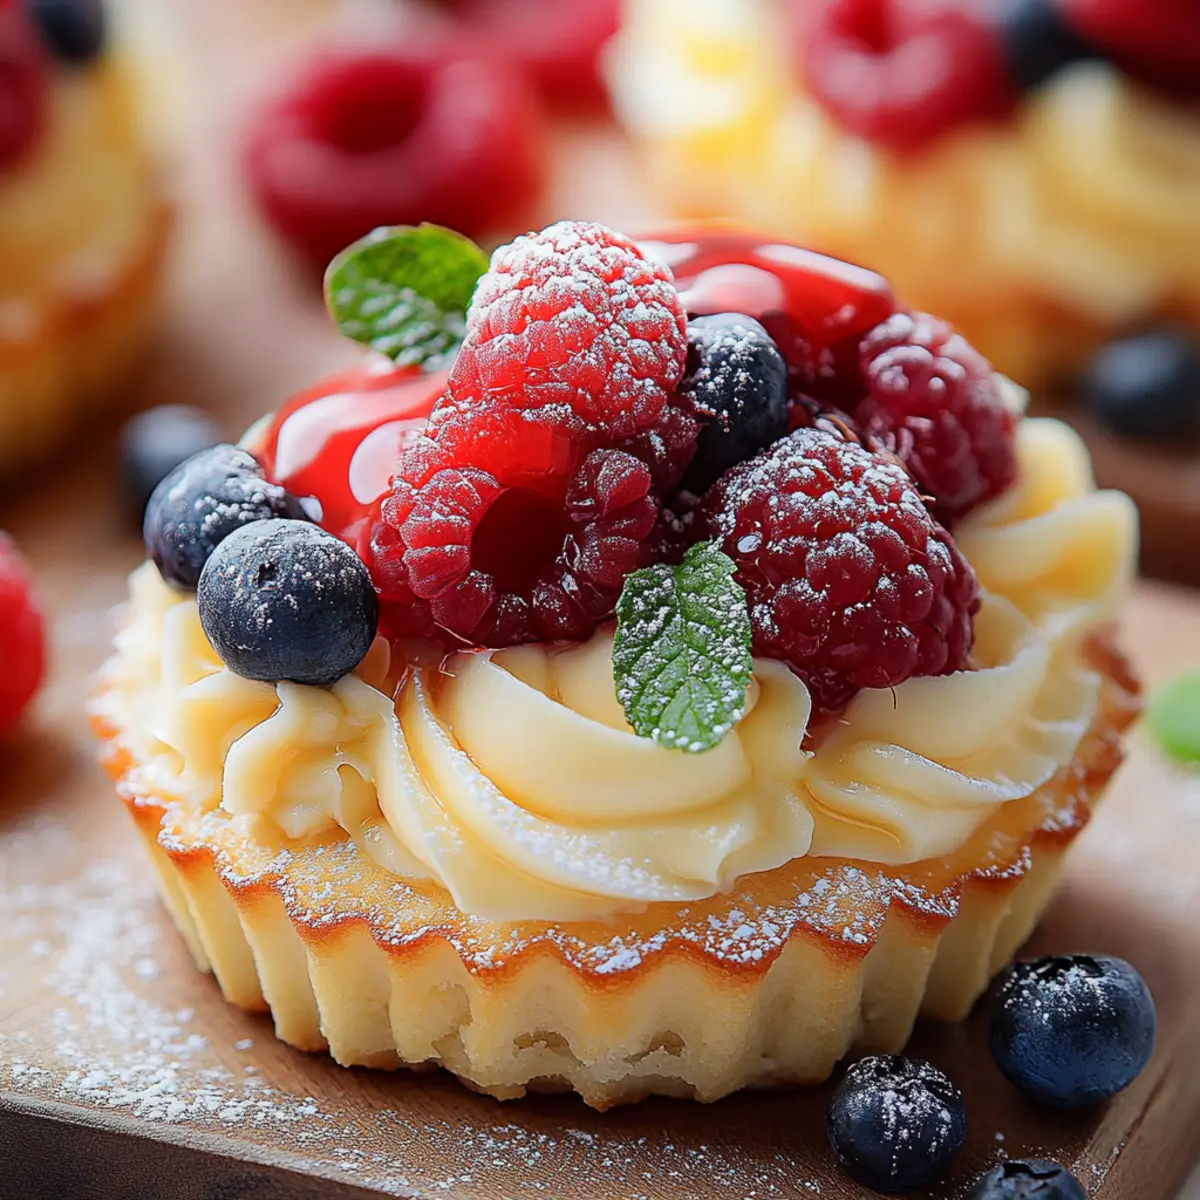
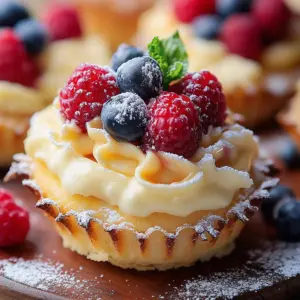
• Berries (strawberries, blueberries, raspberries) – Fresh fruits add color and a burst of flavor.
• Small sprigs of mint – For a refreshing garnish that elevates the presentation.
• Icing sugar (for dusting) – A light dusting gives a lovely finish to your mini cheesecakes.
These Mini Cheesecakes are sure to impress with their delightful taste and charming presentation!
Step‑by‑Step Instructions for Mini Cheesecakes
Step 1: Preheat and Prepare
Begin by preheating your oven to 160°C (325°F), or 140°C for fan ovens. Line a 12-hole standard muffin tin with paper liners, ensuring they sit snugly in each cup to prevent sticking. This will be the cozy home for your delicious Mini Cheesecakes.
Step 2: Make the Crust
In a food processor, break up the digestive biscuits or graham crackers until they become fine crumbs. Combine these crumbs with melted unsalted butter, caster sugar, cinnamon (if desired), and a pinch of salt. Blitz everything together until the mixture resembles wet sand—this will create a flavorful base for your Mini Cheesecakes.
Step 3: Press the Base
Evenly distribute the crumb mixture into the prepared muffin liners, pressing down firmly to create a compact, flat base. This step is key for a sturdy crust. Once you’ve finished, pop the muffin tin in the oven and bake for about 7 minutes. When done, remove and let them cool for 5 minutes—just enough time to prepare your filling.
Step 4: Prepare the Filling
In a large mixing bowl, beat the cream cheese until it reaches a smooth and creamy consistency. Add the plain flour, vanilla extract, sour cream, caster sugar, lemon zest, and a pinch of salt, mixing until fully combined. Incorporate the eggs one at a time, stirring gently until the batter is smooth and thick like pancake batter, ensuring no lumps remain.
Step 5: Fill the Cups
Using a spoon or a measuring cup, carefully divide the creamy filling among the muffin cups, filling each close to the top. This will help create that luscious cheesecake experience. Slide the muffin tin back into the oven and bake for approximately 20 minutes. The filling should be set at the edges but slightly jiggly in the center.
Step 6: Cool and Chill
Allow the cheesecakes to cool in the muffin tin at room temperature for 1 hour. Once they’re slightly cooled, cover them with parchment and cling wrap, and chill in the fridge for at least 6 hours, or overnight if possible. This chilling time helps the flavors meld beautifully and sets the texture perfectly for your Mini Cheesecakes.
Step 7: Whip the Topping
When you're ready to serve, take the Mini Cheesecakes out of the fridge about 30 minutes beforehand. In a mixing bowl, whip the thickened cream with sugar and a splash of vanilla extract until it thickens and forms soft peaks. This delightful topping will elevate your cheesecakes and add an indulgent finish.
Step 8: Decorate and Serve
Dollop or pipe the whipped cream generously on top of each cheesecake. To add a touch of color and flavor, adorn them with fresh berries and small sprigs of mint. Finally, for a beautiful presentation, dust lightly with icing sugar before serving, making your Mini Cheesecakes an irresistible treat at any gathering!
What to Serve with Mini Cheesecakes
To elevate your dessert experience, consider pairing your charming mini treats with delightful accompaniments that complement their creamy richness.
-
Fresh Berries: Strawberries, blueberries, or raspberries add a vibrant burst of flavor, enhancing the sweetness of the cheesecakes while providing a refreshing contrast.
-
Decadent Chocolate Sauce: Drizzling warm chocolate sauce over the top will introduce a rich, luscious element, making each bite even more indulgent and inviting.
-
Zesty Lemon Sorbet: The cool, tart flavor of lemon sorbet refreshes the palate, balancing the creamy density of the cheesecakes beautifully.
-
Whipped Cream: A dollop of lightly sweetened, fluffy whipped cream adds an airy texture, enhancing the decadent nature of the cheesecakes while keeping it light.
-
Coffee or Espresso: A warm cup of coffee or a shot of espresso creates a lovely contrast between the bitterness and the sweetness of the cheesecakes, perfect for an after-dinner treat.
-
Mint Tea: For something refreshing, brew a cup of mint tea. Its soothing notes will cleanse your palate and perfectly complement the cheesecakes' creamy richness.
-
Chocolate-Covered Nuts: Crunchy chocolate-covered almonds or hazelnuts offer a delightful texture and earthy flavor that pairs surprisingly well with the sweetness of mini cheesecakes.
-
Caramel Sauce: A drizzle of homemade or store-bought caramel adds a sweet, buttery note that melds beautifully with the cheesecakes, creating an indulgent treat.
Mini Cheesecakes Variations & Substitutions
Feel free to let your creativity shine with these delectable mini cheesecakes by customizing them in delightful ways!
-
Gluten-Free Base: Use gluten-free biscuits or almond flour mixed with butter for a deliciously crunchy crust.
A gluten-free option doesn't compromise the flavor, ensuring everyone can enjoy a slice of bliss. -
Dairy-Free Alternative: Substitute the cream cheese with a dairy-free cream cheese and use coconut cream for the topping.
This creates a creamy, non-dairy treat that still feels indulgent and satisfying to the palate. -
Flavor Twists: Add a tablespoon of cocoa powder to the filling for a chocolatey twist, or swirl in melted chocolate for a rich experience.
This twist brings an exciting depth of flavor that chocolate lovers won't be able to resist! -
Fruit-Infused: Replace half the cream cheese with blended fruit like strawberries or mango for a fruity flair.
These mini cheesecakes can become bright and refreshing, perfect for spring or summer gatherings. -
Extra Zesty: Increase the lemon zest or add lime zest to brighten the cheesecakes even more for a zingy punch.
The citrus adds a lovely lift, enhancing the overall flavor and making each bite a little more uplifting! -
Heat Factor: Mix in a pinch of cayenne or chili powder for a surprising spicy kick that enhances the sweetness.
This adventurous twist creates a flavor explosion that's bound to intrigue and excite your taste buds! -
Nutty Texture: Fold in some finely chopped nuts like pecans or hazelnuts into the crust for added texture and a nutty flavor.
Nuts not only add crunch but also enhance the overall experience with a delightful richness that complements the filling. -
Compressed Crust: For a denser base, use crushed pretzels instead of biscuits, striking a balance between sweet and salty.
This swap elevates the flavor profile, adding a unique twist that will have everyone asking for seconds!
Make Ahead Options
These Mini Cheesecakes are perfect for meal prep enthusiasts! You can easily prepare the crust and filling up to 24 hours in advance, allowing for a stress-free baking experience. Simply make the biscuit crust and press it into the muffin liners, then prepare the creamy filling and pour it over the crusts. Cover the muffin tin with cling wrap and refrigerate until you’re ready to bake. Once baked, let them cool, chill for at least 6 hours (or overnight), and they will be just as delicious when served. When you’re ready to enjoy, whip the cream and top with your favorite berries—effortlessly impressive with minimal last-minute work!
Expert Tips for Mini Cheesecakes
Proper Cooling: Allow the cheesecakes to cool completely before chilling. This helps set the texture and enhances their creamy consistency.
Room Temperature Ingredients: Make sure your cream cheese and eggs are at room temperature. This ensures a smooth filling without lumps in your Mini Cheesecakes.
Don’t Overbake: Keep an eye on the cheesecakes while baking. They should be just set but still slightly jiggle in the center—overbaking can lead to a dry texture.
Chill Time is Key: For the best flavor, let your Mini Cheesecakes chill overnight if possible; this allows the flavors to meld beautifully.
Serving Suggestions: For a delightful presentation, serve them with a variety of toppings like berries or mint; this not only enhances flavor but also visual appeal!
How to Store and Freeze Mini Cheesecakes
Fridge: Store leftover Mini Cheesecakes in an airtight container in the fridge for up to 5 days, ensuring they maintain their creamy texture.
Freezer: For longer storage, place unadorned Mini Cheesecakes in a freezer-safe container or wrap them individually in plastic wrap, and freeze for up to 2 months.
Thawing: To enjoy frozen Mini Cheesecakes, transfer them to the fridge to thaw overnight before serving.
Reheating: Though these treats are best served chilled, you can briefly leave them at room temperature for 20-30 minutes for a fresh, creamy taste.
Mini Cheesecakes Recipe FAQs
How do I choose the best cream cheese for my Mini Cheesecakes?
Absolutely! For the creamiest texture, opt for block cream cheese rather than spreadable versions, as it has a higher fat content and less moisture. Ensure it’s at room temperature before mixing, as this helps achieve a smooth consistency without lumps. Look for reputable brands that are made with natural ingredients for the best flavor.
How should I store leftover Mini Cheesecakes?
Store your Mini Cheesecakes in an airtight container in the fridge for up to 5 days. This keeps them fresh and maintains their delightful creamy texture. If using a plastic container, place a piece of parchment paper between the layers to prevent sticking—every bite should be as good as the first!
Can Mini Cheesecakes be frozen?
Yes, they can! To freeze Mini Cheesecakes, place them in a freezer-safe container or wrap each cheesecake individually in plastic wrap. They will keep well for up to 2 months. When you're ready to enjoy them, transfer them to the fridge to thaw overnight. This allows them to retain their flavor and texture beautifully.
What if my filling is too lumpy?
No worries! If you find that your filling has lumps, it’s likely due to the cream cheese being too cold or not being beaten enough. To fix this, ensure all your ingredients are at room temperature before starting. Beat the cream cheese until smooth and creamy before adding in the other ingredients. If lumps persist, you can use an immersion blender to smooth out the mixture before proceeding with the recipe.
Are Mini Cheesecakes safe for kids? Any dietary considerations?
Very much! Mini Cheesecakes are a lovely treat for kids, but be mindful of potential allergies, especially related to dairy and eggs. If you’re catering to a vegan audience or those with specific dietary needs, consider using dairy-free cream cheese alternatives and flax eggs or applesauce to replace the eggs, adjusting cooking times if necessary. Always check with your guests in advance to ensure a safe and enjoyable treat for everyone!
What toppings work best for my Mini Cheesecakes?
The more the merrier! While classic toppings include fresh berries like strawberries, blueberries, and raspberries for a fruity kick, you can also get creative with crushed nuts, chocolate shavings, or a drizzle of caramel sauce for added flair. Consider the season and your personal taste—whatever brings a smile to your face will make your Mini Cheesecakes truly special!
Irresistibly Creamy Mini Cheesecakes Just Like Grandma Made
Equipment
- Oven
- muffin tin
- food processor
- mixing bowl
- whisk
Ingredients
For the Crust
- 200 grams Digestive biscuits or graham cracker squares
- 100 grams Unsalted butter melted
- 50 grams Caster sugar
- 1 teaspoon Cinnamon powder optional
- a pinch Salt
For the Filling
- 500 grams Cream cheese at room temperature
- 30 grams Plain flour
- 1 teaspoon Vanilla extract
- 100 grams Sour cream or plain yogurt
- 100 grams Caster sugar adjust to taste
- 1 teaspoon Lemon zest
- 2 Eggs at room temperature
For the Topping
- 250 milliliters Thickened or heavy cream
- 1 teaspoon Vanilla extract for topping
- 50 grams Icing sugar or caster sugar to sweeten
Optional Decorations
- Berries (strawberries, blueberries, raspberries) for garnish
- Small sprigs of mint for garnish
- 1 tablespoon Icing sugar for dusting
Instructions
Step-by-Step Instructions
- Preheat your oven to 160°C (325°F) or 140°C for fan ovens. Line a 12-hole standard muffin tin with paper liners.
- In a food processor, crush the digestive biscuits until fine crumbs. Mix with melted butter, caster sugar, cinnamon, and a pinch of salt.
- Press the crumb mixture into the muffin liners and bake for about 7 minutes. Let cool for 5 minutes.
- Beat the cream cheese until smooth, then mix in flour, vanilla extract, sour cream, caster sugar, lemon zest, and salt. Add eggs one at a time.
- Divide the filling among the muffin cups, filling each close to the top. Bake for about 20 minutes.
- Cool in the muffin tin at room temperature for 1 hour, then chill in the refrigerator for at least 6 hours.
- Whip the thickened cream with sugar and vanilla extract until it forms soft peaks.
- Pipe or dollop the whipped cream on top of each cheesecake. Decorate with berries, mint, and dust with icing sugar.