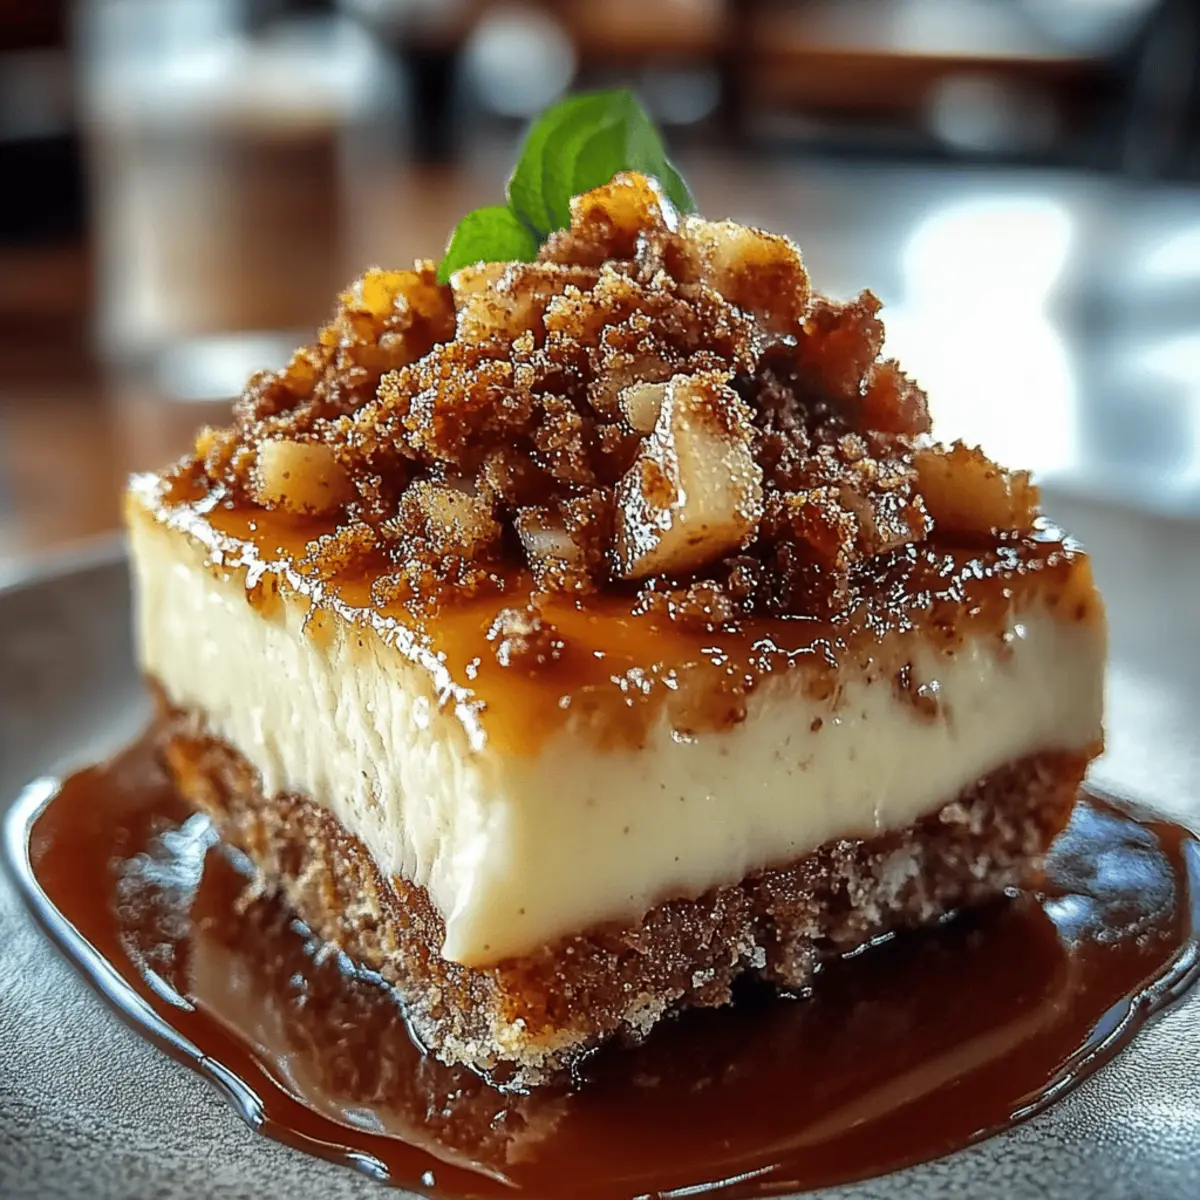
As the aroma of warm, cinnamon-spiced apples wafts through my kitchen, I can’t help but smile; it’s like a cozy hug in dessert form. Today, I’m excited to share my favorite recipe for Apple Crisp Cheesecake, a delightful fusion that combines the creamy richness of cheesecake with the comforting goodness of apple crisp. This dessert not only looks stunning when served but also offers an irresistible perk: it’s surprisingly simple to prepare and is sure to impress your guests at your next gathering. Plus, it’s a fantastic way to use up those fresh apples from the farmers’ market! Are you ready to elevate your dessert game and create a treat that will leave everyone asking for seconds? Let’s get started!

Why is this Apple Crisp Cheesecake a must-try?
Irresistible Flavor: The blend of cream cheese and sweet apples creates a luscious filling that’s hard to resist.
Easy to Make: No need for advanced baking skills; this recipe is perfect for beginners and seasoned chefs alike.
Crowd-Pleasing Delight: This dessert is a showstopper, sure to have everyone at your table raving about seconds.
Versatile Serving Options: Enjoy it with a scoop of vanilla ice cream or a drizzle of caramel for an extra indulgent touch.
Perfect for Any Occasion: Whether it’s a holiday gathering or a cozy weeknight treat, this Apple Crisp Cheesecake is a delicious way to celebrate!
Apple Crisp Cheesecake Ingredients
For the Crust
- Graham cracker crumbs – these form a sweet, crunchy base that holds everything together.
- Melted butter – adds moisture and richness, helping to bind the crust nicely.
- Sugar – a touch of sweetness enhances the overall flavor of the crust.
For the Cheesecake Filling
- Cream cheese (softened) – provides that creamy, velvety texture we love in cheesecake.
- Sugar – sweetens the filling just right, balancing the tartness of the apples.
- Large eggs – these help the cheesecake to set perfectly as it bakes.
- Vanilla extract – infuses a lovely aroma and depth of flavor into the filling.
- Chopped apples (peeled and cored) – fresh apples add natural sweetness and a delightful crunch.
For the Topping
- Brown sugar – adds a rich, caramel-like sweetness that enhances the apple flavor.
- Rolled oats – provide a hearty texture, reminiscent of traditional apple crisp.
- Flour – helps to thicken the topping, creating that perfect crumbly finish.
- Cinnamon – infuses a warm spice that complements the sweet apples beautifully.
- Cold butter (cubed) – cutting in cold butter creates a crumbly texture that’s simply irresistible.
This Apple Crisp Cheesecake recipe combines these delectable ingredients to create a dessert that's just as good as it sounds!
Step‑by‑Step Instructions for Apple Crisp Cheesecake
Step 1: Preheat the Oven
Begin by preheating your oven to 325°F (163°C). This temperature is essential for baking your Apple Crisp Cheesecake evenly, ensuring that it sets perfectly while maintaining a creamy texture. Take this time to gather your ingredients so you're ready to move swiftly through the next steps.
Step 2: Prepare the Crust
In a mixing bowl, combine 1.5 cups of graham cracker crumbs, 0.5 cups of melted butter, and 0.25 cups of sugar. Stir until fully incorporated and the mixture resembles wet sand. Press this mixture firmly into the bottom of a springform pan, making sure it's packed tightly to create a sturdy crust. Set the pan aside as you move on to the filling.
Step 3: Make the Cheesecake Filling
In a large mixing bowl, beat together 16 oz of softened cream cheese and 1 cup of sugar using an electric mixer on medium speed. Continue mixing for about 2–3 minutes until the mixture is smooth and creamy, ensuring there are no lumps. The filling should be light and airy, ready to embrace the apples that will follow.
Step 4: Incorporate the Eggs
Add two large eggs to the cream cheese mixture, one at a time. Beat well after each addition for about 30 seconds to ensure they are fully incorporated. This step is crucial for achieving a rich texture in your Apple Crisp Cheesecake; the eggs help it rise and set beautifully during baking.
Step 5: Add Vanilla and Apples
Next, mix in 1 teaspoon of vanilla extract until just combined. Gently fold in 2 cups of chopped, peeled, and cored apples, taking care not to overmix. You want to preserve the chunks of apple within the creamy filling while giving the Apple Crisp Cheesecake delightful bursts of flavor and texture.
Step 6: Pour the Filling Over the Crust
Carefully pour the apple-flavored cream cheese mixture over the prepared graham cracker crust in your springform pan. Use a spatula to spread it evenly, ensuring that the filling reaches all edges. This layer is what makes your cheesecake so special, blending the flavors of apple crisp and cheesecake harmoniously.
Step 7: Prepare the Oat Topping
In a separate bowl, mix together 0.5 cups of brown sugar, 0.5 cups of rolled oats, 0.5 cups of flour, and 1 teaspoon of cinnamon. Cut in 0.25 cups of cold, cubed butter using a pastry cutter or your fingers until the mixture has a crumbly texture. This topping will add that delightful crunchy layer to your Apple Crisp Cheesecake.
Step 8: Assemble the Cheesecake
Sprinkle the oat mixture evenly over the apple filling in your springform pan, ensuring it covers the entire surface. This topping is key to achieving the traditional crispy finish that complements the creamy cheesecake beneath. It should look both appetizing and inviting, signaling a delicious treat ahead.
Step 9: Bake the Cheesecake
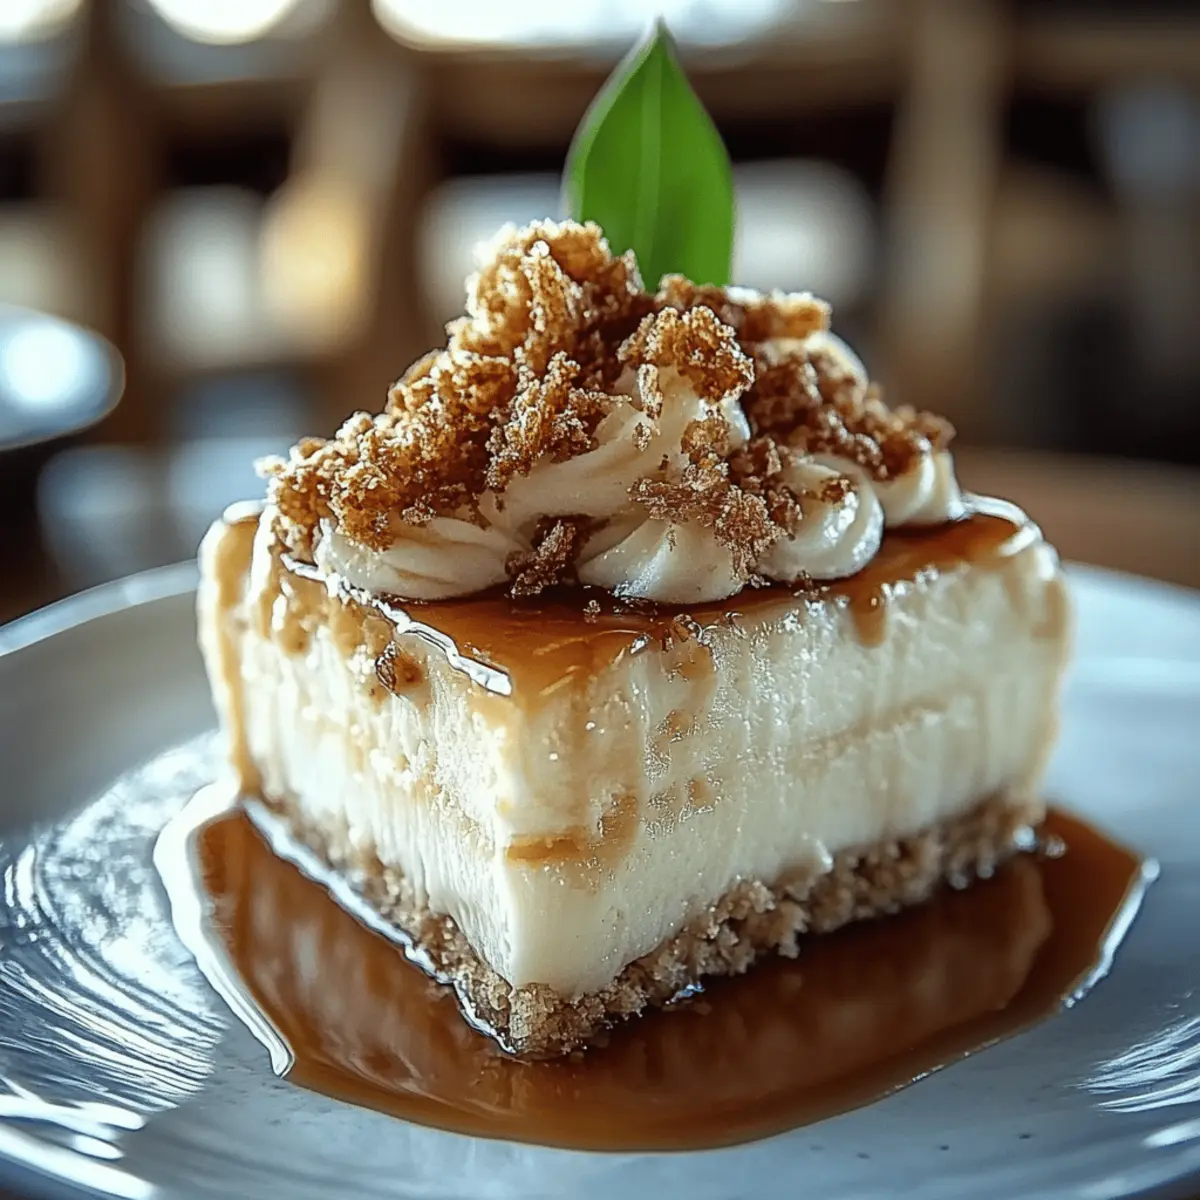
Place your springform pan in the preheated oven and bake for 50–60 minutes. The Apple Crisp Cheesecake is done when the sides are set, and the center has a slight jiggle but does not appear liquid. You’ll notice the top turning a light golden brown, adding to the visual appeal of your dessert.
Step 10: Cool and Serve
Once baked, remove the cheesecake from the oven and allow it to cool on a wire rack for about an hour. Then refrigerate it for at least 4 hours or preferably overnight. This cooling period is essential for achieving a firm texture, making it easier to slice. Serve chilled, and savor each delicious bite of your Apple Crisp Cheesecake!
What to Serve with Apple Crisp Cheesecake
Indulging in a slice of this cheesecake is delightful, but enhancing your meal experience with perfect pairings brings joy to every bite.
-
Whipped Cream: A dollop of freshly whipped cream adds a lightness that balances the richness of the cheesecake, creating a heavenly taste experience.
-
Vanilla Ice Cream: The melt-in-your-mouth creaminess of vanilla ice cream complements the warm apple flavors beautifully, offering a delightful contrast in temperature.
-
Caramel Sauce: Drizzling warm caramel over each slice elevates the sweet notes while enhancing the apple's natural sweetness, turning each bite into pure bliss.
-
Cinnamon Sugar Dusting: Lightly sprinkle a mixture of cinnamon and sugar on the cheesecake for added warmth and a lovely finishing touch to the dessert.
-
Fresh Berries: The tartness of fresh berries like raspberries or strawberries introduces a bright, fruity element, perfectly counterbalancing the cheesecake’s sweetness.
-
Coffee or Tea: A warm cup of coffee or fragrant tea pairs wonderfully with this dessert, making each moment feel cozy and inviting, perfect for a leisurely afternoon.
-
Apple Cider: For a seasonal touch, serving warm spiced apple cider alongside reinforces the apple flavor while providing a warming, comforting feel to your meal.
How to Store and Freeze Apple Crisp Cheesecake
Fridge: Store any leftovers in an airtight container for up to 5 days. This helps preserve the creamy texture and flavors of the Apple Crisp Cheesecake.
Freezer: For longer storage, wrap slices in plastic wrap and aluminum foil, then freeze for up to 3 months. Be sure to label them for easy identification!
Thawing: To enjoy frozen cheesecake, transfer it to the fridge for 6–8 hours or overnight. This gentle thawing method maintains its delightful creamy texture.
Reheating: If desired, warm individual slices in the microwave for 15–30 seconds for a cozy dessert experience without compromising the taste.
Make Ahead Options
These Apple Crisp Cheesecake are perfect for busy home cooks looking to save time on dessert prep! You can prepare the crust and the cheesecake filling up to 24 hours in advance. Simply assemble the crust and refrigerate it. For the filling, mix the cream cheese, sugar, eggs, and apple mixture, then refrigerate in an airtight container. When you're ready to bake, pour the filling over the crust, prepare the oat topping, and bake as instructed. This will help ensure your cheesecake is just as delicious, preserving the creamy texture and vibrant flavors. Enjoy easier entertaining or weeknight desserts with this thoughtful make-ahead strategy!
Expert Tips for Apple Crisp Cheesecake
-
Room Temperature Ingredients: Ensure your cream cheese and eggs are at room temperature to prevent lumps in the filling, making your Apple Crisp Cheesecake smooth and creamy.
-
Don't Overmix: Once you fold in the apples, mix gently to keep their chunks intact. Overmixing can lead to a dense texture, which we want to avoid!
-
Check for Doneness: The cheesecake should have a slight jiggle in the center when done. Overbaking will dry it out, so keep an eye on it during the last few minutes of baking.
-
Cooling Time Matters: Allow the cheesecake to cool completely before refrigerating it. This helps it set properly, leading to perfect slices every time.
-
Serving Suggestions: Experiment with toppings! Pairing your Apple Crisp Cheesecake with vanilla ice cream or a drizzle of caramel sauce can elevate the flavors and impress your guests.
Apple Crisp Cheesecake Variations
Feel free to let your creativity shine and customize your Apple Crisp Cheesecake with these delightful twists!
-
Gluten-Free: Substitute graham cracker crumbs with gluten-free cookies or almond flour for a tasty gluten-free base. You'll still enjoy that same delicious flavor without the gluten!
-
Vegan: Swap cream cheese for cashew cream and use flax eggs in place of traditional eggs. This makes for a creamy, plant-based delight that everyone can enjoy, without sacrificing richness.
-
Spicy Kick: Add a pinch of cayenne pepper or some grated ginger to the apple mixture for a surprising twist! It creates a warm, spicy note that contrasts beautifully with the sweetness of the apples.
-
Nutty Crunch: Fold in some chopped walnuts or pecans into the apple filling for extra crunch and flavor. This addition not only enhances the texture but also adds a lovely nutty aroma!
-
Mixed Berries: Mix some fresh or frozen berries with the apples for a fruity explosion of flavor. This combination creates a beautiful color contrast and adds delightful tartness to each bite.
-
Caramel Sauce Drizzle: Top your cheesecake with melted caramel sauce just before serving for an indulgent touch. The sweet and gooey drizzle elevates the overall dessert experience and brings extra sweetness.
-
Cheesecake Swirl: Incorporate a rich caramel or chocolate swirl into the cream cheese filling before baking. This creates a marbled effect that looks stunning and adds an extra depth of flavor.
No matter how you choose to modify it, your Apple Crisp Cheesecake will be a sweet treat that captures hearts and taste buds alike!
Apple Crisp Cheesecake Recipe FAQs
How do I choose the right apples for this cheesecake?
Absolutely! For the best flavor, I recommend using a mix of sweet and tart apples, like Granny Smith and Honeycrisp. Look for firm apples with no dark spots or bruises. They should feel heavy for their size, indicating juiciness and freshness.
What’s the best way to store leftover Apple Crisp Cheesecake?
You can store any leftovers in an airtight container in the fridge for up to 5 days. Just make sure it's well-covered to prevent it from absorbing other flavors in the fridge. For optimal freshness, line the container with parchment paper before sealing.
Can I freeze Apple Crisp Cheesecake?
Yes, you can! Wrap individual slices tightly in plastic wrap followed by aluminum foil to prevent freezer burn and store them in the freezer for up to 3 months. Be sure to label the film with the date for easy identification. When you're craving a slice, simply transfer it to the fridge for 6–8 hours or overnight before enjoying.
What if my cheesecake cracks while baking?
Very! A cracked cheesecake can happen if it's overbaked or if the temperature is too high. To prevent this, consider using a water bath or only baking it until the edges are set and the center has a slight jiggle – this ensures a creamy texture. If cracks do appear, don’t worry; you can top with whipped cream or caramel sauce to hide them!
Can I make this cheesecake gluten-free?
Absolutely! You can easily substitute graham cracker crumbs with gluten-free alternatives or crushed nuts for the crust. Additionally, ensure the flour used in the topping is gluten-free. This way, everyone can indulge in a slice of Apple Crisp Cheesecake without worries!
Is Apple Crisp Cheesecake suitable for my pets?
Very importantly! This cheesecake contains sugar and cream cheese, which can upset a pet's stomach. It's best to keep this delicious treat for human consumption and look for pet-safe options if you want to share a little love with your furry friends.
Indulgent Apple Crisp Cheesecake for Cozy Nights
Equipment
- mixing bowl
- Springform pan
- electric mixer
- spatula
- Measuring cups
- Measuring spoons
- Pastry cutter
- wire rack
Ingredients
Crust
- 1.5 cups graham cracker crumbs
- 0.5 cups melted butter
- 0.25 cups sugar
Cheesecake Filling
- 16 oz softened cream cheese
- 1 cups sugar
- 2 large eggs
- 1 teaspoon vanilla extract
- 2 cups chopped apples (peeled and cored)
Topping
- 0.5 cups brown sugar
- 0.5 cups rolled oats
- 0.5 cups flour
- 1 teaspoon cinnamon
- 0.25 cups cold butter (cubed)
Instructions
Steps
- Preheat your oven to 325°F (163°C).
- In a mixing bowl, combine graham cracker crumbs, melted butter, and sugar. Stir until it resembles wet sand and press into a springform pan.
- In another bowl, beat cream cheese and sugar until smooth, about 2-3 minutes.
- Add eggs one at a time, mixing for 30 seconds after each addition.
- Mix in vanilla and gently fold in chopped apples.
- Pour the filling over the crust and spread evenly.
- In a bowl, mix brown sugar, oats, flour, and cinnamon. Cut in cold butter until crumbly and sprinkle over the filling.
- Bake for 50-60 minutes until the sides are set and the center is slightly jiggly.
- Cool on a wire rack for about an hour, then refrigerate for at least 4 hours or overnight.
- Serve chilled and enjoy!